Showing posts with label Disney. Show all posts

Thursday, October 29, 2015

Easy Peasy Halloween

...using stuff you already have in your closet!

Last year I was Mary Poppins for work (I work at a library), and then I was also Black Widow for going out at night (nice and warm for a chilly October night, and I had most of the stuff in my closet).

This year I'm doing two costumes again: one for the day (babysitting and work), and one for the night (going out with friends) (because how can anyone pick just one costume when Halloween's only once a year?!).

For the daytime I'm going as Cat Woman (which is essentially my DIY Black Widow costume from last year, just tweaked).  Black Widow, or Cat Woman are super duper easy to put together last minute (like even day of, easy!).  This year I'm working at my newest job, Aerie, annnnd babysitting, so I know that I'll want to be comfortable and able to run around easily (and don't forget, work appropriate).

Both costumes are the same outfit; the only difference is the change in accessories!

For Cat Woman, I just used an old, plain black cat mask that I'll wear on my head (kinda like those glasses Ann Hathaway wears in the Dark Knight Rises).


For Black Widow I switched out the cat mask for a DIY'ed belt buckle, which I made out of red and black foam, to look like the back of a black widow spider (which took all of two seconds to make!).


Black Widow/Cat Woman is made up of work out clothes; you can't get any more comfier than that (or warmer!).  And even better, they're pieces that you can wear long after Halloween's over (score!)!  All you need is a pair of black OTK (over the knee) boots, black leggings (mine are a LC Kohl's clearance find, half-leather, half-cotton find), black workout zip up, chunky black belt (with DIY belt buckle safety-pinned to the front if you're going as Black Widow) and a black utility belt I found on Amazon.  And my gloves?  They're old lacrosse gloves from high school that I spray painted black!  It definitely doesn't get any easier than that; plus, you can wear all the pieces waaaaaay after Halloween (so you don't have to feel that guilt of paying $40+ on a costume that you probably won't ever wear again)!

For Halloween night this year, I'm going as Lilo from Lilo and Stitch (I just love that movie!)!  Again, super easier than you think, to put together.


While you're probably not going to be wearing a hula skirt any time soon after Halloween (and if you are, I'm totally jealous, because it's probably a good time wherever you're going, haha), you could totally re-wear the crop top (paired with a cute midi/high-waisted skirt perhaps?).


How stinkin' adorable is this little Stitch backpack?!  My inner child is totally obsessed.  Plus it's functional for keeping all my things safe for a night out on the town!


"This is your badness level.  It's unusually hight for someone of your size."
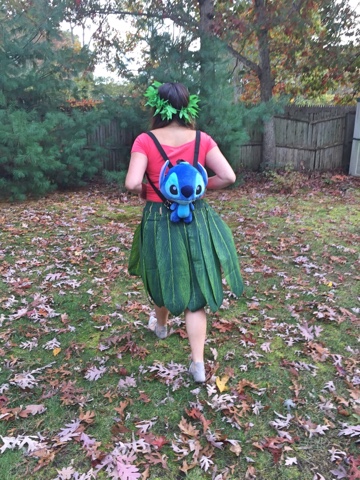


And these flats?  I don't even have to worry about getting use out of them--I've already worn them like fifty times since I got them last month!!!


Go forth and DIY the hell out of Halloween!  :)

Tuesday, October 28, 2014

Supercalifragilisticexpialidocious


Every year I start thinking about what to be for Halloween in like, August/September.  Extreme I know, but its my favorite part of the holiday.  As a kid I was ready to get my costume as soon as they were put out in the stores (I was a bit over excited-- sorry mom).  Now that I'm older (and paying for my own costumes), money really needs to go to other things (bills, gas--growing up kind of sucks doesn't it?) and now I'm slowly learning how to make a dollar stretch.  And that means figuring out how to make a costume out of what I have, and buy the least amount as possible (or making things myself).

And so I began searching with some serious purpose through hundreds and hundreds of pins.  Thank goodness for such a strong sense of D.I.Y on the web.  Now because I work at a library, the costume obviously has to be family friendly (and of course easy to move in).  And then I stumbled up it: Mary Poppins.  I was "pinspired", if you will, by Lauren Conrad and Keiko Lynn.  It was cute, it was easy, and best of all I was able to make about 90%o of the costumes from pieces I already had in my closet (or that my sister had in hers, lol)!
Lauren Conrad: Halloween 2012


Keiko Lynn: Halloween 2013


The hat was actually must easier than I thought it would be.  Get out your glue guns y'all.  It's time to get craftin'!

Here's what you'll need:
  • 5 pieces of stiff black felt
  • 2 branches of fake flowers (I got red & white.  And they even sell them at pretty much any dollar store!)
  • red ribbon
  • hot glue
  • black thread and needle

1. The body of the hat I made by hot gluing (or if you have time you can just go straight to sewing it together) two of the sheets of felt together (I connected the two pieces with a strip of scrap felt along the seam of the two pieces).  Then, I fit the whole thing around my head, trimmed accordingly and glued (I overlapped a bit).

2. Using the body of the hat I traced the top piece of the hat on another sheet of felt.  I left about an inch around the traced circle (so that there's one circle inside the other).  Cut tabs about an inch apart around the hat (from the outer circle's edge to the trace line of the inner circle) so that attaching it to the body of the hat was much easier.  I then hot glued a few (like four) of the tabs to the inside of the hat to keep it in place as I sewed the top on (if you're pressed for time, hot glue the whole thing and trim the extra felt).
Left: hot glue // Right: Stitched around the edge where the top of the hat meets the body (also helps to hide any hot glue mess, and softens the harsh lines of the top of the hat).
3.  To be honest, for the brim I eyeballed most of it. Again I used the body of the hat to trace a circle (that becomes the hole to allow you to put the hat on), and then I guesstimated how wide the brim should be.  I eyeballed a couple of inches (maybe seven or so) off the traced circle (I overestimated, and then as I tried on the hat I trimmed accordingly).  I then attached it to the rest of the hat with hot glue (after cutting out the center of course!)

4.  For my own taste, the inside of the brim was too stiff (and a bit scratchy when I tried it on), so what I did was dampen a hand towel, turned the hat on its top and draped the damp towel over the hat brim and left over night (don't soak the towel, you don't want a soggy hat).  The next morning it was softer and much less rough on my forehead.


5. A simple red ribbon was hot glued around the hat, and then a few fake flowers.


Ta-da!  You've got yourself a hat (a total of about $7-$10) that Mary Poppins would be proud of!  :)


If you don't have some of these pieces, shop these similar looks (that can be worn together or separate time and time again, long after Halloween is past):
Both skirt are from Charlotte Russe (and they're both on sale now!):
For a little fashion-forward edginess, this faux leather midi skirt is a steal at only $15!!  (Plus, how awesome would this skirt look for day or night wear?!)
They also have a more high waisted midi (also on sale, $20!!) that could be paired with a cute cropped top!

This tuxedo-pleat shirt is perfect for Mary Poppins, and when Halloween is through, can be paired with jeans and flats, or dressed up with a blazer (and also, another sale find!)
Mary Poppins' lace up boots can also double as a cold weather staple!

Black stockings, also a wardrobe essential.  Need I say more?
Her red bow tie?  I used this cheerleader bow from Michael's.  $3, easy-peasey!  (Just hot glue a safety pin or two to secure to your top)


Supercalifragilisticexpialidocious--say that ten time fast ;)