Monday, December 22, 2014

Cheers to the New Year!!!

New Year's Eve is already next week!  Can you believe it?  And the best way to kick off the new year?  Look good, feel good!  My favorite NYE looks are either super sparkly, or have a great, bold shape to it; it's one of the best occasions to dress up!

I've put together a few of my favorite NYE  looks. If you're having a hard time figuring out what to wear, one of these dresses are sure to make a statement! 
You can't get more va-va-voom than this wine-colored backless dress!
The high slit on this Line and Dot Monroe dress is sooo Angie!
I'm in love with this Crossed the Line gold sequin dress!  The color, the draped, low back.  #obsessed.
Emerald sequins?!  Yes please!!
Love the neckline and the wrap bottom of this H&M strapless dress!
I love the subtle shimmer of this knotted metallic wrap dress (and it's under $20)!
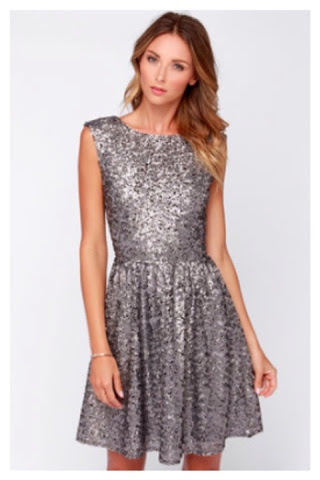
The sparkle and silhouette on this grey sequin skater dress is super flattering for all body types!
This sequined velveteen dress 
The collar on this twisted-front embellished dress is the perfect built-in accessory!

What are your favorite NYE looks?  :)

Sunday, December 21, 2014

Happy Holidays

It's #manicuremonday, and this week I worked on a special holiday half-moon manicure, because lately, I'm pretty much Team Half-Moon all day, everyday; but, this can totally work as a regular manicure too!


What You'll Need:
1. Base Coat (I used Sally Hansen's "Miracle nail thickener")
2. Red polish (I used Essie's "Wrapped in Ruby", it has a gold undertone that's super festive and perfect for Christmas!)
3. Green polish (I used Sinful Colors "Garden Party")
4. Gold polish (I used Nicole by O.P.I. "On A Gilt Trip")
5. Top coat
6. Nail glue
7. Tape
8. Round stickers (I found little smiley face stickers at Dollar Tree)
9. Nail crystals (relatively small and you can find them on Amazon for practically nothing)
10. Nail art brush (I used the brush from a bottle of nail art polish


1. Apply base coat.

2. After your base coat dries completely, apply the stickers to your nails (except on your ring fingers).  Make sure to firmly press down so that there aren't any gaps where the polish could leak under.

I found that for my thumbs I need a few stickers, overlapping, to make the half-moon.

3.  Apply two coats of your red polish.


4. Cut a piece of tape in two, and stick on at an angle so that the two pieces form a triangle (make sure that the triangle is wide enough so that you are able to fit the nail crystals).  Like the stickers, make sure there are no gaps under the tape so that the nail polish doesn't leak under (you want nice crisp lines!).


5. Make sure that the polish is completely dried before removing the tape.  If it's still a little tacky the polish could get smudged or pulled up (as you can see, the top of my tree is a little lopsided...oops).


6. Using the brush from a nail art polish (make sure you wipe the brush clean first), I used the gold polish to paint along the edge half moon.


7. Last but not least, using the nail glue, cover the green polish with nail glue, then take a wax pencil or tweezers and place the nail jewels to "decorate the tree".  Then go back over the jewels with more nail glue, followed by the top coat (apply top coat to rest of nails as well).


Voila!  This manicure was super easy to do, and not-too-cheesy of a holiday mani.
Happy holidays y'all! :)


Check out my other manis: What A Stud // Star Studded // Tape It // Stellar // Good As Gold


Thursday, December 18, 2014

The Stockings Were Hung By the Chimney With Care

You can't have Christmas without stockings!  Nowadays almost anything can be a stocking stuffer, so long as it's small enough to fit in the stocking.  Instead of candies, accessories, mini-fied goodies, and even gift cards to a favorite place are the way to go.


Tuesday, December 16, 2014

Gift Guide: A-Z

Christmas is next week, but there's still time for some last minute shopping!  To help my fellow last-minute shoppers, I've compiled an A-[mostly]Z (oops, lol) gift guide!  :)


A: Art
B: BaubleBar Bracelets: tassels, #obsessed // blanket scarf
G: Gloves
H: Hat
N: Nail polish: , Ciate Advent calendar // Nike for J.Crew
P: Pearls // Personalized Stationary (tartan or bumble bee)
U: Umbrella (now on sale, 50% off!)

Hope I was able to help y'all with any gift-buying brain freezes!
Happy holidays and happy shopping!  :)


Sunday, December 14, 2014

Stellar Manicure

Half-moon manicures are hands down my favorite style to get.  But I have to admit, they're a pain to DIY.  Nevertheless, as an avid Pinner, I've found that using sticker rings (the ones you would use to keep binder paper from ripping) seems to work.  Unlucky for me, I couldn't find any, therefore, I improvised--with smiley face stickers from Dollar Tree!

They worked perfectly!  :)


Here's what you'll need:

  • round stickers (the dollar store always has some)
  • silver nail polish
  • base coat and top coat
  • colored nail studs
  • nail glue
  • tweezers

1. Start off with your base coat.  One coat is good; let it dry completely.
2. Once your base coat is completely dry, press on the stickers (it's important that everything is dry, otherwise the stickers will peel off your base coat).

Make sure the stickers are pressed down firmly; to keep nail polish from leaking under and ruining your crisp line.
For my thumb I overlapped three stickers, so that the half-moon is proportional to the other nails.
3. Apply two coats of the silver polish and let dry completely.  Again, this is super important.  If you peel off the stickers before the polish is completely dry, it'll get smudged or peeled off.
With the stickers, you can paint right over them!  Super easy!
Ta-da!  Nice, crisp, half-moons.  For a more classic look (maybe use a red polish), you can stop here and apply a top coat.
4. Next step, applying the studs.  I used colored studs because they pop really well on a silver background.  Right above the half-moon line, place two drops of nail glue.  I placed the bigger stud right above the line, then the smaller stud right above that one (I used a tiny bit of nail glue to pick up the stud and place it on the nail).

5. Use the tweezers or a wax pencil to gently press down on the studs, then apply nail glue around the edges of the studs.  Finish with a top coat (which will also smooth out the glue).

To decorate, use nail studs.  You can find these on Amazon for practically nothing (no more than $5).

6. Voila!  Another easy manicure!  :)

This manicure was actually much more simpler to do thanks to the stickers!  Check out some other manicure DIYs! ('What A Stud', 'Good As Gold''Tape It', 'Star Studded')