Showing posts with label DIY. Show all posts

Thursday, October 29, 2015

Easy Peasy Halloween

...using stuff you already have in your closet!

Last year I was Mary Poppins for work (I work at a library), and then I was also Black Widow for going out at night (nice and warm for a chilly October night, and I had most of the stuff in my closet).

This year I'm doing two costumes again: one for the day (babysitting and work), and one for the night (going out with friends) (because how can anyone pick just one costume when Halloween's only once a year?!).

For the daytime I'm going as Cat Woman (which is essentially my DIY Black Widow costume from last year, just tweaked).  Black Widow, or Cat Woman are super duper easy to put together last minute (like even day of, easy!).  This year I'm working at my newest job, Aerie, annnnd babysitting, so I know that I'll want to be comfortable and able to run around easily (and don't forget, work appropriate).

Both costumes are the same outfit; the only difference is the change in accessories!

For Cat Woman, I just used an old, plain black cat mask that I'll wear on my head (kinda like those glasses Ann Hathaway wears in the Dark Knight Rises).


For Black Widow I switched out the cat mask for a DIY'ed belt buckle, which I made out of red and black foam, to look like the back of a black widow spider (which took all of two seconds to make!).


Black Widow/Cat Woman is made up of work out clothes; you can't get any more comfier than that (or warmer!).  And even better, they're pieces that you can wear long after Halloween's over (score!)!  All you need is a pair of black OTK (over the knee) boots, black leggings (mine are a LC Kohl's clearance find, half-leather, half-cotton find), black workout zip up, chunky black belt (with DIY belt buckle safety-pinned to the front if you're going as Black Widow) and a black utility belt I found on Amazon.  And my gloves?  They're old lacrosse gloves from high school that I spray painted black!  It definitely doesn't get any easier than that; plus, you can wear all the pieces waaaaaay after Halloween (so you don't have to feel that guilt of paying $40+ on a costume that you probably won't ever wear again)!

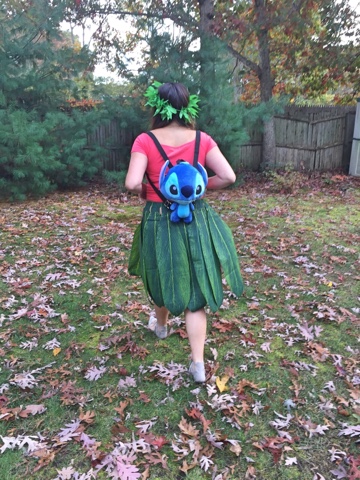
For Halloween night this year, I'm going as Lilo from Lilo and Stitch (I just love that movie!)!  Again, super easier than you think, to put together.


While you're probably not going to be wearing a hula skirt any time soon after Halloween (and if you are, I'm totally jealous, because it's probably a good time wherever you're going, haha), you could totally re-wear the crop top (paired with a cute midi/high-waisted skirt perhaps?).


How stinkin' adorable is this little Stitch backpack?!  My inner child is totally obsessed.  Plus it's functional for keeping all my things safe for a night out on the town!


"This is your badness level.  It's unusually hight for someone of your size."


And these flats?  I don't even have to worry about getting use out of them--I've already worn them like fifty times since I got them last month!!!


Go forth and DIY the hell out of Halloween!  :)

Monday, August 17, 2015

Easy Peasy Retro Scarf Hair Style

If you're like me, styling your hair all by yourself is a challenge.  Anything I've accomplished hair styling-wise is the result of lots and lots of practice (for example, it took me the longest time to learn how to curl my own hair, I used this youtube video, by my friend, and awesome hair stylist, Sam!  Seriously, if you're not so hair savvy, this video will be a major help; I can now proudly boast beautiful 10-minute curls!).

Now retro hair styles are a whole 'nother ball game.  I've tried quite a few times to recreate those glamorous victory rolls that my favorite pin-up IG'ers rock, and let me tell you, they must be using magic, because I can't for the life of me figure out how to get it done.

But fear not!  I've found a super simple way to add some retro flair to your 'do without wanting to pull out your hair.  The easy peasy solution?  A vintage scarf.  You can find one of these at any vintage/thrift store for under $10.  You can even use a bandana!  And those you can find at a craft store for about $1.

This look is perfect for summer.  It keeps the hair out of your face, and looks like you put a lot of thought into your hair (when we both know, it only took a minute or two!).


Here's what to do:
1.  From top to bottom (aka, one point to another), fold your scarf.

2.  Fold the point at the top to the edge of the bottom.

3.  Repeat step #2 at least once or twice more (or even three times!), depending on how thick or skinny you want the band to be.

4. Tie the scarf around your head, with the knot and scarf tails (ends?  What do you even call them? haha) at the nape of your neck (but I usually push mine to one side and let the "tails" hang over one shoulder). 

5.  Use bobby pins to keep the scarf in place (especially if you're using a silky scarf; they get a little slippery and slide off if they're not held into place). I usually do two bobby pins on the top sides of my head and two on the back side. 

6. Voila!  A super easy way to add a little vintage touch to your outfit! :)


So breathe easy friends!  It doesn't get any easier (or cuter!) than this!  :)

P.S.  These cat eye sunnies, from Paper Doll Vintage Boutique, (which I talked about here), add an extra touch of retro glam!

Tuesday, April 28, 2015

You Are the Pine-Apple of My Eye!


Pineapples (especially in sunglasses) are still definitely a major trend; and I'm totally okay with that.  It's cute, it's fun, and when the picture's been taken you can turn it into a pool drink or a tasty snack!  Inspired by this trend are a lot of pineapple accessories, clothing, decor, you name it!  I've rounded up a few of my favorite picks (thank you Pinterest!) to share with you guys!

This lamp is made out of plastic spoons and plastic bottle!  Can you believe it?!

This is definitely my next iPhone case for sure; I love the mix of playful prints and the color palette!  (Plus it's only $20.25 and you can get it for the iPhone or Samsung Galaxy)

Waaaaay better than your ordinary (and boring) wine cork.

And what goes better with your pineapple bottle stopper than a matching stemless wine glass?

I would wear this with all of my sun dresses!

I love the print and the pom poms together; it's so fun!

Nice, bright statement shoes that are also comfortable (it's a win win!)!

This Anthropologie Pina Lace top is definitely a splurge piece; but there's no shame in the mantra: "Treat yo self"!

What do you guys think of the pineapple craze?

Wednesday, April 22, 2015

Weekly Pin-spirations

Today's been a typical sick (insert sad face) day: home early from work, change into sweats, in bed with ginger ale, and scrolling through Instagram (check out my feed here) and Pinterest (and my feed here) when I'm not sleeping.  So I've rounded up my favorite Pins from today to share with y'all!

When I saw this Nasty Gal dress, I knew I needed it. I'm a major fan of the confetti-like polka dots (and the colorful pom poms are the icing on the cake!)!

When I finally move into an apartment (coming soon!) I just know that I'll need these DIY tumblers for my dream bar cart!  Simple, fun, and they look look pretty easy to accomplish!  

And I think I'll definitely have to give this a go with some mason jars as well!

How cute is this Kate Spade-inspired DIY?  This is definitely the top of my DIY to-do list!

I've wanted to try some sort of faux-hawk hair style forever!  Except I never really saw a style I liked enough that was both edgy and girly--this one is totally it though (*two thumbs up*).

I'm totally #TEAMKATE (she's my style icon).  And Kate Middleton memes?  Can't have enough.  (I'm also a fan of Lorde's "Royals" as well).

Pin 
I'm drooling over this dining room.  I love all the details, and the walls of books?!  It's like something out of my childhood Disney princess dreams.  It's exactly what my dream office would look like.

I'd like a pair in every color, and varying monogram styles please!  Seriously, how much fun are these Converse?  These are from Etsy store RobynBobbinMonograms, and they're now on my shoe wish list!


What are some of your favorite pins this week?

Tuesday, April 14, 2015

Manicure: Sprinkles

This post is a day late for Manicure Monday, buuuuuut, better late than never (plus I didn't want to wait a whole week to post this!)!  This nail art is inspired by one of my latest pins: a sprinkles manicure!
Photo: Pinterest

1.  I painted a single coat of my base coat, using Sally Hansen's Triple Strong.

2.  Two coats of Essie's Topless and Barefoot (allow for some dry time between coats, this will give you a more even finish).


3.  Time for the sprinkles!  I used a nail art specific nail polish brush with a nice thin brush (I got it at Dollar Tree!); make sure you wipe off all the polish from the brush (tissue's fine) before dipping into any other colors.  

These are the colors I used (I tried to stay as close as I could to the colors used in the pin):

  • White: Sally Hansen Hard Nails Extreme "White On"
  • Orange: Sally Hansen Insta-Dry "Man-go Team!"
  • Blue: Probelle "Into the Blue"
  • Pink: Julie "Damsel"
  • Green: Sinful Colors "Garden Party"
4.  Depending on your nail length, the amount of "sprinkles" you'll paint on will vary.  My nails are pretty short right now so I only did about 2-3 of each color on each nail.  The great thing about this manicure is that you don't have to be perfect!  (Just make sure there isn't too much of the nail polish on the brush, otherwise it'll blob up or run)

  • quick tip: Do all your nails the same color sprinkle at the same time, instead of doing each nail all the colors at once.  Don't be a hero and just make your life easier, lol.


5.  Once all the "sprinkles" have dried, apply your top coat, and voila!  All done!

Doesn't look exactly like the pin, but I'm proud to say it still looks pretty darn good!  :)


I've got an entire Pinterest board dedicated to manicures/nail art I'm dying to try (or wishing I could even attempt...seriously, some of these people have to be wizards or something!)!  Check out my board here:

Or check out my own manicure DIYs:
Shamrocks and Studs

Anyone else attempt manis they've pinned on Pinterest?  :)

Monday, March 16, 2015

Manicure Monday: Shamrocks & Studs

Saint Paddy's Day is tomorrow, and I completely forgot until someone reminded me today at work!

Here's a simple DIY manicure that's perfect for tomorrow's shamrock filled day.


What you'll need:

  • green nail polish 
  • white nail polish
  • a thin nail brush
  • gold studs
  • nail glue
  • base coat
  • top coat
  • tweezers

1.  Starting with clean (and filed/clipped/shaped) finger nails, apply your base coat.  I always do just one, even coat, to avoid chipping.


2.  Paint only your ring fingers white.


3.  Paint the rest of your nails green.


4.  Time for the shamrocks!  All it is really, is a few strokes placed together.  Easy-peasy!


5.  On the green nails, apply a dot of nail glue towards the base of your nail (right above your cuticles), and then, using tweezers, apply the nail stud.  You can use the end of your tweezer to gently press the stud into place to make sure it's firmly secured.


6.  Finish with a top coat and let dry!


Check out my other DIY manis here!